What causes vehicle vibration?
Tire and wheel imbalance is one of the most likely causes of vehicle vibration. Other causes can be related to drivetrain issues and / or bent components. Tire and wheel imbalance can result in a cupped tire wear pattern, traction loss and premature wear to suspension and steering parts.
The front tires produce more noticeable symptoms than the rear when out of balance due to the translation through the suspension and steering components and the feedback felt at the steering wheel. Vibrations from a rear imbalance may not be as obvious, but will still result in tire wear.
Tire imbalance results when the weight of a tire's materials is not distributed equally throughout the tire thus resulting in the tire being heavier on one side than the other. The imbalance can be caused by issues in manufacturing, or from tire wear. New tires will have minor imbalances that are correctable by adding a wheel weight to a specified location to counter the effect of the imbalance. If excessive weight amounts are needed to balance the tire it may be an indication of a defective tire or that the tire may be incorrectly seated on the wheel rim.
It is possible to balance an out-of-round tire and wheel assembly and still have vibration due to wheel hop (also call wheel tramp). It should be noted that runout of less than 0.030" will not typically cause a noticeable vibration. However, runout of more than 0.125" is recommended for replacement of the tire or wheel. Although it is theoretically possible to balance a square tire and wheel, it does not mean that it will roll smoothly.
Types of Wheel Weights
Clip-On weights are hammered in place and Tape-On weights use adhesive double-sided tape.


Clip-on Wheel Weights
Correcting imbalances requires attaching wheel weights to the rim. Clip-on wheel weights are attached to the rim using a wheel weight hammer. There are several types of clip-on weights available in 1/4 ounce increments. Different types of clips are available to accommodate the variety of wheel types and wheel covers. Aluminum wheels with a flange for a clip-on weight may require a coated or alloy clip so they will not corrode the wheel.

Different types of Clip-On weights fit a variety of applications.
Tape-on Wheel Weights
Tape-on weights may also be used for aluminum wheels. Tape-on weights are available in strips that can be cut to length to achieve the desired weight amount. These weights are attached by means of double-sided adhesive tape after cleaning the wheel area. Tape-on weights can be placed in a hidden placement on the inside of the wheel so they are not noticeable on the outside for the best appearance. Chrome weight strips are also available.
Aluminum, painted and alloy wheels can be easily scratched and it is worth noting to use plastic protectors to cover tire tools to prevent damage.

Tape-On Weights on Camaro Wheel (above)
The use of lead wheel weights began in the 1930's. Lead weights were banned by The European Commission in 2005 and they are now also banned in several of The United States. Alternative weights are made of steel or zinc or a zinc alloy called ZAMA, which combines zinc, aluminum and copper. Lead free tape-on weights are also available.

WHEEL BALANCING
Static Wheel Balancer
There are two types of wheel balancing, static and dynamic. Static means an object is stationary. Therefore, before computer balancing, static balancing was performed with the wheel at rest. If a wheel with static imbalance was mounted on a spindle with the heavy spot on top, the heavy spot would rotate to the lowest possible position on its own. If the wheel was in balance statically, it would not have the tendency to rotate by itself.

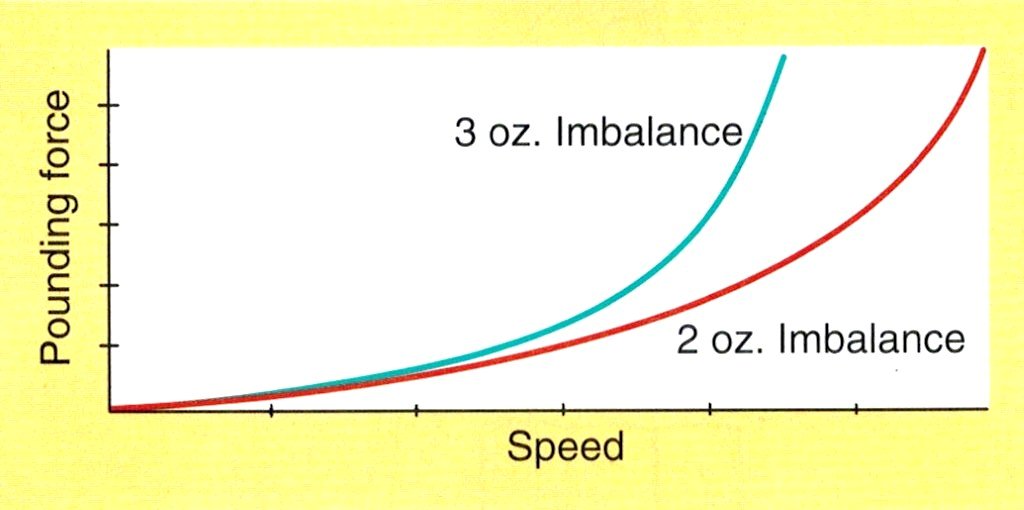
Force is directed out away from center of wheel during rotation
Static imbalance subjects the wheel to vertical (up and down) impacts that become worse with higher speed. These impacts occur when a tire has a heavy spot on one end of its tread. A small amount of imbalance when a wheel is at rest can amount to a great deal of impact force when the wheel is spinning at highway speeds. For instance, if a 15" wheel is 1 ounce out of balance at rest, at 60 mph the impact force will be 4.6 pounds.
Static imbalance causes tire wear that creates a gouging effect which results in a cupping or scalloped pattern on the tire tread. Mechanical parts are also worn prematurely by these vibrations. Extreme cases can result in a hopping tire that can actually leave the road, especially when coupled with a bad shock absorber (known as wheel or tire hop, also wheel tramp).
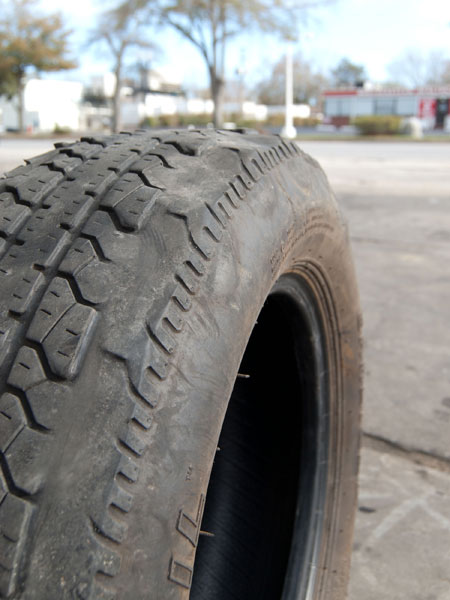
Cupped Tire Wear (above)
STATIC FRICTION
The part of the tire in contact with the road is actually traveling at 0 mph. This is called static friction. During wheel tramp when the tire returns to the road, a small amount of its rubber is scrubbed off. This is because the tire was traveling at the same speed as the vehicle when it left the road. This scrubbing happens all around the tire, accounting for the cupped wear around the entire circumference of the tread surface.
STATIC BALANCING
In the past, narrow bias ply tires were static balanced on a bubble balancer. Today's modern computer wheel balancers are capable of measuring the static imbalance of a spinning tire and wheel, the name remains from when the imbalance was measured with the wheel at rest on a bubble balancer. Static balancing, also called single-plane balancing, is done in a single plane where compensating weight is added on the opposite side of the wheel. Modern wheel Balancers are able to determine the amount of weight imbalance and the location of the weight placement exactly opposite of the heavy spot on the tire. Static balancing is one option among several balancing modes on today's computer wheel Balancers. Although there are better modes of balancing aluminum wheels, this option might be used when choosing to hide the wheel weights on the inside of the wheel. When static balancing an aluminum wheel, it is popular to use tape-on weights to the inside of the wheel at the center plane.
Dynamic Wheel Balance
Dynamic balance means balance in motion. It is also called two-plane balance because it measures side to side (lateral) force as well as up and down (axial or radial) force. Lateral forces are noticeable when a steering wheel moves back and forth. A computer wheel balancer spins the wheel and determines the locations and amounts of vibration. The computer splits the tire into two halves and measures both lateral and radial forces on each side of the tire's center. Weights are added to each side of the wheel to correct the imbalance. Therefore, a tire that is dynamically balanced is also statically balanced. Dynamic balancing can be performed with a computer wheel balancer or with an on-the-car spin balancer.
DYNAMIC IMBALANCE
When a tire has more weight on the inside or outside of its tread, it has a dynamic imbalance. Dynamic imbalance is only noticeable when the tire and wheel is spinning. The tire will have a tendency to shimmy from side to side (left and right) which also results in faster tire wear. When the tire is spinning the heavy spot will tend to seek the centerline of the tire. This is why the tire shimmies from side to side. When the heavy spot is in front, it pushes the wheel to one side. After the tire rotates one half revolution, the heavy spot causes the wheel to try to turn in the opposite direction. However, most tires have imbalances on both sides of the tire, requiring counterbalancing weights to be placed on both sides of the wheel.

Action Of Dynamic Imbalance
A wheel might be in static balance but not dynamically balanced. If a tire has been statically balanced by putting all of the counter weight on one side of the wheel, that weight creates a dynamic imbalance once the wheel is spinning causing a side to side shimmy. The correct way to balance a wheel statically is to split the weight amount in half and place equal weight amounts on both sides of the wheel. Some tire manufacturers recommend this procedure when the amount of weight exceeds 20 grams or .71 ounce. It is unlikely for a tire to have a static imbalance and not have a dynamic imbalance as well. When a wheel and tire have been dynamically balanced, both types of imbalances can be eliminated.
COMPUTER WHEEL BALANCERS
Computer wheel Balancers are popular, accurate and easy to use for balancing tires in both the static and dynamic modes. Computer balancing is usually performed after a tire repair or when a new tire has been installed on a wheel. The wheel is mounted to a horizontal threaded shaft using adapters that are supplied with the machine.
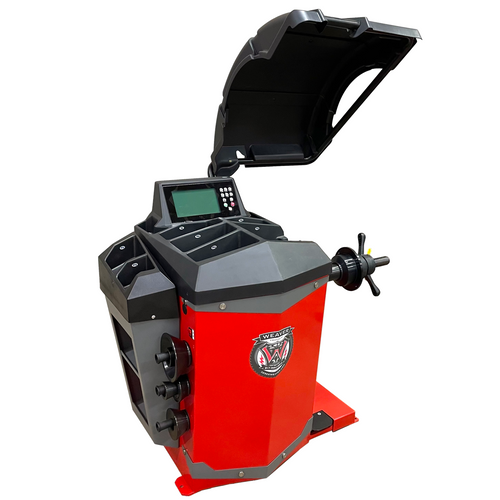
Weaver Computer Wheel Balancer Model W-987 (above)
How to Mount a Wheel on a Balancer
Another cause of imbalance can be caused by a wheel that was improperly mounted on the wheel balancer. According to FMC Corporation, a 36 pound tire and wheel assembly that is off center by only .006" will result in a 1/2 ounce imbalance error. The effect of this type of imbalance can be demonstrated by first balancing a tire and wheel assembly on the balancer, then loosen the wheel enough to place a standard business card between the flange plate on the balancer and the wheel. Tighten and respin the assembly with the card in place and notice the difference in the weight readings measured by the balancer. The best method for mounting a wheel on the balancer is the method specified by the manufacturer. The method will duplicate the method by which the wheel is centered on the vehicle.
There are two ways that wheels are centered on a vehicle:
Hub-centric mounting is when the hole at the center of the wheel locates the wheel on the wheel hub or axle.
Lug-centric mounting is when the lug nuts center the wheel.
To determine whether or not a wheel is hub-centric, see if the wheel fits the hub snugly with the lug nuts removed. If you can move the wheel up and down or side to side, then the wheel is lug-centric. When a wheel is lug-centric is uses the taper on the lug nuts to center the wheel.
How to Mount Hub-Centric Wheels
Always make sure that the adapters and the wheel are clean and undamaged. Remove any rocks or debris from the tire and wheel before balancing. Use a centering cone to mount a hub-centric wheel. On stamped steel wheels, install the cone from the back or inside of the wheel. This is because the wheel was originally stamped from the back or inside of the wheel. The recommended arrangement of adapters installed on the shaft is:
1st- The spring (some modern balancers have a built-in spring).
2nd- The cone that fits the wheel hub.
3rd- The tire & wheel assembly.
4th- The retainer cup or drum (a protective ring is typically used on the cup to protect the wheel finish).
5th- The wing nut (most modern balancers use a quick nut that can bypass the shaft threads for faster tightening). 
Hub-Centric Mounting
As the wheel is tightened on the shaft, the spring will keep pressure on the cone to center properly. It is common to spin the tire in the opposite direction (counter clockwise as viewed from the shaft end) to help promote the best centering. The retainer cup allows an area for the small end of the cone to protrude through the wheel hub while providing a means for the wing nut to tighten the assembly on the shaft. The wing nut should be hand tightened only. It is an accepted practice to rock the weight of the assembly counter clockwise with both hands on the wing nut then tighten in a clockwise direction. A snug fit is all that is required to prevent the assembly from spinning or slipping on the shaft during the spin cycles. The condition of the cones is critical to accurate balancing. A new cone has a tolerance of .001” clearance on the shaft. Worn or loose fitting cones and shafts should be replaced for best results. There are expandable split collets available for a more accurate centering. These collets expand when tightened, eliminating all clearance between the collet and the shaft.
How to Mount Lug-Centric Wheels
To mount lug-centric wheels, use a lug-centering adapter plate. Universal adapter plates have several lug stud swing arms that are attached in different places depending on the number of lug holes in the wheel. There are only five adapter arms. With six lug wheels, use three arms. With eight lug wheels, use 4 arms. After the arms are installed and tightened on the adapter, the adapter is held against the mounting flange on the wheel balancer by installing screws. Special lug nuts hold the wheel against the adapter plate. Do not overtighten them.

Universal Lug-Centric Adapter W-B-W-1000000 (above)

Lug-Centric Mounting (above)
Case History - A man purchased a used Suburban that had aftermarket aluminum wheels and oversized tires. The tires appeared to be in good condition, with less than half of the tread worn. Unfortunately, they had been balanced incorrectly using adapters in the center hub hole instead of a lug-centric adapter. The tires had worn unevenly and developed a cupped tread wear pattern. They were now too far out of balance and had to be replaced.
How to Program a Wheel Balancer
After the wheel is mounted on the balancer, there are three parameters that are programmed into the balancer:
1) The Width (Bre on some balancers) of the rim, measured by a rim width caliper.
2) The Distance the rim is from the backing plate flange, measured by sliding the distance scale out to the rim edge or bead edge.
3) The Diameter of the wheel (example, 15”, 16”, 16.5”).
The wheel is spun for a short few seconds and then stops. The balancer will then show the results by displaying the readout on the screen. The readout shows the weight amounts and the locations for them to be installed on the wheel. After the weights have been installed, the balancer is spun again to check for the accuracy of the balance job. A reading of “zero” or OK on both sides of the wheel means the wheel is balanced and ready to be installed back on the vehicle.

Balancer Display showing weights amount, weight location, and dynamic balance mode. Also showing the distance, width and diameter settings of the wheel (Model shown Weaver W-977). (above)
For cosmetic and appearance purposes, tape-on weights are often used in various modes available on the balancer. These modes (ALU modes on some machines) allow for a variety of weight placements and hidden weight methods to allow for the best appearance while maintaining the quality of a dynamic balance. Calculations are made by the balancer’s computer to provide the correct weight amount and location accordingly.

Tape-On Weights Applied to Inside of Wheel (above)
When balancing aluminum wheels with tape-on weights, use duct tape to temporarily attach the weights to the wheel during the initial balance. Install the outside weight as near to the outside as possible. The inside weight is placed on the inside edge of the wheel. Always be certain that there is enough clearance between the wheel weights and the brake caliper.
REPEATABILITY - VERY IMPORTANT!
The quest for a REPEATABLE balancer is obtainable if you can duplicate the mount. There are 2 conditions to test that will help you understand (it does not matter which brand of machine you are using). The accuracy of a Weaver®Wheel Balancer is 1 gram or .10 ounce.
1) Testing the balancer - This is easy to do. By watching our calibration video you will see the balancer tested at the end of calibration by using a test weight to check the balancers accuracy. This tells us if the balancer is reading accurately or if it has an issue. When the balancer is calibrated and reading accurately, a test weight will define the ability of the balancer to read the correct weight amount and location. It is the same method to check any brand of balancer.
2) Testing the physical mounting apparatus (this can be the cone, collets, mounting plates etc) - Once you have completed the accuracy test after calibration and the balancer is reading correct, anything you change with regards to the mounting (physically) will affect the readings from the previous mount. We have already confirmed the balancer is reading accurately so if you loosen and rotate the wheel the only change being made is physical. When using cones you will realize that there is a tolerance of about 2-3 thousands of an inch to allow the cone to slide over the shaft threads (this gets worse over time as the threads wear). Combine that with the tolerance in the particular wheel hub and it is a guarantee that it will change the mounting position of the wheel if rotated or remounted thus changing the balance (wheel balancers are very accurate and will sense this minimal change). If it repeats, you are simply lucky to hit near the same mounting position. The more accurate the mounting device you use, say a Universal Lug Adapter or Low Taper Collet Set (both are available in our category “Wheel Balancer Parts and Accessories) specific to the make of the wheel, then you can begin to look for better Repeatability (on any machine) because you have a greater ability to reproduce the same mounted physical position. This physical change has nothing to do with the balancer’s capability and has everything to do with your ability to reproduce the same mounted position.
When mounting, the goal is to reproduce the same way it is mounted on the vehicle. A perfectly balanced tire and wheel assembly can be mounted back on the vehicle incorrectly and produce an imbalance. Mounting is the most critical component to a good balance result on the road. To demonstrate the change that can result from mounting changes, simply balance a wheel on the machine, only loosen the assembly (without rotating and do not remove the wheel) and place a typical business card (an uncoated business card is about .013") between the backing plate and the wheel. Tighten and respin to see the change in weight amount produced by the card alone. It is profound!
If your only concern is repeatability, you will need to invest in a Universal Lug Adapter, Low Taper Collet Set or mounting plate sets made by Haweka to raise the accuracy of mounting. Remember, even with this much accuracy it is vital that the assembly be mounted correctly on the vehicle for the best result. Mounting Matters!
